Tuesday 31 March 2020

How To Configure Bellsouth Email Settings For Outlook?

In the United States Bellsouth email service is quite famous. As States has a large number of customers of Bellsouth, therefore they also get into so many troubles related to it. Hence Bellsouth email settings require a bit of expert advice if you are not aware of it. When you decide to you this email service provider you have to do setup first.
Bellsouth Email Settings
Are you unaware of the Bellsouth email setup process? Don’t you know how to proceed with is you face any technical issues in it? Well, don’t worry here in this blog you will get all the solutions. The issues generally users face are either related to sing-up or send/receive an error. So, if you are facing any one of errors or some other issues then take the complete tour of the blog to get complete knowledge about it.
As so many users also use Outlook as their go-to email client, hence there you will also find the email settings about how to configure Bellsouth.net account on Outlook.

Bellsouth Email Settings For Outlook

Setting up the Hotmail account in Outlook.com is as simple as it sounds. While doing this you don’t need to do any manual configuration of incoming and outgoing servers. Just enter the credentials and sink emails and you are done.
But it is not the same case with third-party email clients. As some of them need manually approach when configuring POP3 SMPT servers. If you have knowledge about the procedure then obviously it will e easy for you. However, if not then don’t worry you can easily set up the Bellsouth email by following our guide. Below is the guide to setup Bellsouth email in Outlook on Windows 10.
  • Open the Outlook client
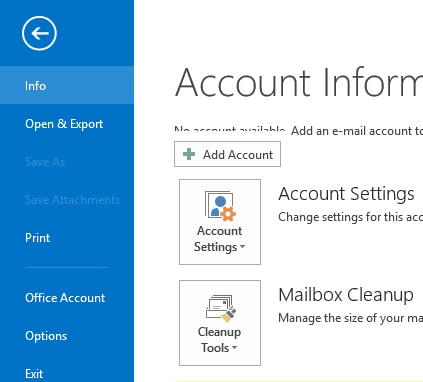
  • Select File and click on Add Account
  • Now select “Manual configuration server setting or additional server types”
  • Click Next >> Yes on the new window
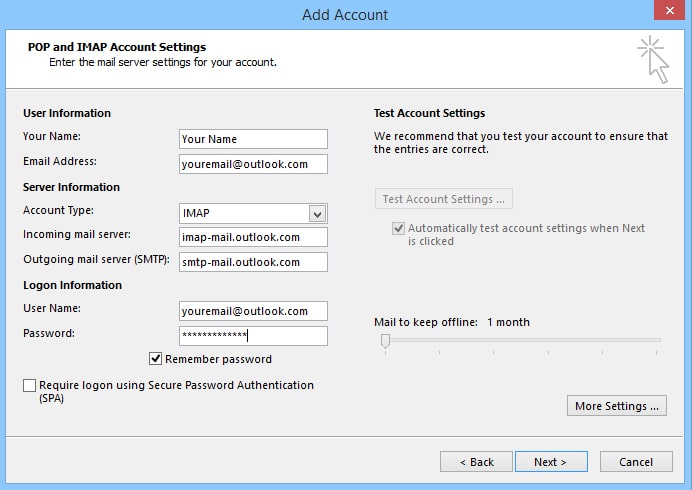
  • Next, you need to enter the Bellsouth email address and name
  • Select IMAP and POP and click on Next
  • In Incoming Mail Server: ‘imap.mail.att.net’In Outgoing Mail Server: ‘smtp.mail.att.net’
  • When prompted enter your email address and password
  • Click on More Settings and check both “My outgoing server (SMTP) requires authentication” and “Use same settings as my incoming mail server” boxes.
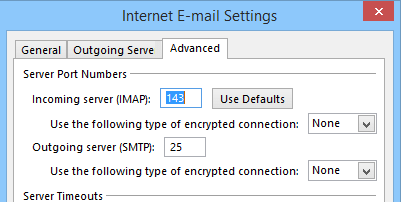
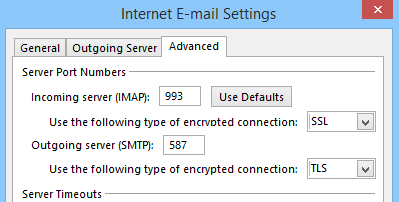
  • Now click on Advanced tab and make sure that incoming Server port number for POP3 is 995
  • And ensure that Outgoing Server Port has- 465
  • Now, under SSL disable- Use the following type of encrypted connection.
  • Click Finish, the email setup process is completed now
Now you can enjoy your Bellsouth and Outlook mail in one place. If Outlook is your go-to email service provider don’t worry you won’t miss your Bellsouth email mails, because now you can access them on Outlook as well.

Troubleshoot Issues:

While setting Bellsouth email, configuring with Outlook, or signing up if you face any error, you can consult with Bellsouth email expert for instant solutions. If you are facing the send and receive an error, you should look for all kinds of configurations that you have done recently. And still, find yourself unable in solving the issue, consult the Bellsouth skilled technicians to get the best solutions of the error.
By performing the above Bellsouth email settings you will be able to send and receive emails without facing any issue. Outlook will allow you all kinds of configuration options and settings, therefore ensure that you customize it according to your needs.
Originally published on emailsupport.us

How To Configure Outlook IMAP Settings With Outlook.com account

If you are looking for the Outlook IMAP settings, then you have landed on the right page. As there is no point for roaming here and there just get complete information on one thing. But here you will get complete guidance on the Outlook IMAP setup process with the Outlook.com account. As outlook is a popular email service provider all around the world, because of its advanced features. It also allows users to manage there all things in one place. After setting up IMAP you can access over Outlook.com account even if you use it on browser or app.
Outlook IMAP Settings
You will get complete guidance on- how to configure outlook IMAP with outlook.com account. It includes a few steps and changes in Outlook settings that you need to save to apply the changes. Is it sounding a little daunting? Don’t worry below we have explained all the information step-by-step below.

Configure Outlook IMAP Settings

To add your account to Outlook, Outlook on the web, Outlook.com or the Mail and Calendar apps for Windows 10, you need several pieces of information. The information includes account type, the incoming and outgoing server names, and the port and SSL settings.
And if you using a similar email service such as- Outlook.com, use the below-given table:
ProtocolServerPortEncryption
IMAPimap-mail.outlook.com993TLS
SMTPsmtp-mail.outlook.com587STARTTLS
POPpop-mail.outlook.com995TLS

Follow The Step-by-Step Guide Instructions:

  • Open your Outlook and click on File Tab on the upper left corner of the Outlook Window.
outlook imap settings
  • Now Click on Add Account
outlook imap settings
  • Next, you need to select Manual setup or additional server types.
  • Click Next to proceed further.
  • In the Add Account window, under the Choose Service page, you need to choose one option among three.
  • Tick on Pop or IMAP. Click Next in the next window you will be asked to enter a few details:
  • Here you have to type your name and email address.
    • In Account Type drop-down – select IMAP.
    • Set Incoming mail server to imap-mail.outlook.com
    • Set Outgoing mail server (SMTP)to smtp-mail.outlook.com
  • Fill your Login information: User Name and Password
  • After filling all the detail you need to click on More Settings.
outlook imap settings
  • In the new window tap on Outgoing Server
  • Tick on My outgoing server (SMTP) requires authentication
  • After completing this, you need to tap on Advanced setting option
outlook imap settings
  • Under Server Port Number you need to fill information carefully:
    • In ‘Set Incoming server (IMAP)’ enter- 993.
    • In ‘Use the following type of encrypted connection’ enter – SSL.
    • In ‘Set Outgoing server (SMTP)’ enter- 587.
    • In ‘Use the following type of encrypted connection’ enter- TLS.
outlook imap settings
  • Scroll down and click OK
  • Click Next and then Add Account window to test the settings.
  • Now Click Save to secure your changes.

Outlook.com IMAP Connection Errors:

While doing Outlook settings using IMAP, you may encounter an error if you configured your outlook.com account as IMAP in multiple email clients. Hence, to fix the connection in Outlook.com during the process you can try resolving with the help of the below steps.
  • Navigate to account.live.com/activity and sign in using the email address and password of the account that is affected.
  • In the Recent Activity tap, you need to locate for the Session Type event. This is a need because it will show you the exact time when you received the connection error. Click on it to expand.
  • Tick on ‘This was me’ to let the system clear authorize issues.
  • Attempt to connect to the account via your IMAP client.
If you want to get more information about- how to use the Recent Activity page, then you can go by- what is the recent activity page?

Conclusion:

Hence, the guide above will make you able to connect configure your Outlook setting using IMAP to access Outlook.com. However you find any issue while doing such, you can take expert help to solve it immediately. While configuring if you face any error other than connection issues, you can take expert help to rectify it.
Originally published on emailsupport.us

Saturday 28 March 2020

Easy Ways For The Configuration Of CenturyLink Email Settings


Easy Ways For The Configuration Of CenturyLink Email Settings

Want to create a CenturyLink email account? Well, for this first you have to perform a few CenturyLink email settings steps, after which you will be able to enjoy the amazing features. To enjoy the benefits of CenturyLink high-speed internet service, remember you should have the account. And today here in this blog you are going to learn about how to create the CenturyLink account. After creating the account you will be able to use its popular features about which you even don’t know.
Below we have given the best suitable steps to follow to create the Century link account and take all the benefits of it.
CenturyLink Email Settings Required To Create Your CenturyLink Email Account
As there are two ways to create the CenturyLink account and we have mentioned both the steps here in this blog. After reading about both, you can choose any option you want to go with. So, the first step is to create it when you install your service. And another way is that you can conveniently do it later when you feel like doing.
So let’s go with option one first.


Option 1: Create When You Install Your Service
When you install your new CenturyLink high-speed internet service, you will need its account as well to access it. Therefore, at the same time, you are prompted to create a login for your CenturyLink home page. And when you see that on your screen, do the following:
·        Choose “I want to create a new account as my login to my CenturyLink home page”
·        Click Next
·        Enter the email address or login
·        Then create the password to access
·        Next, when it prompts you to need to choose a secret question
·        Then give the answer corresponding to it
·        Now click Next
Congratulations! You have created your new CenturyLink email address successfully. If you face any technical issue while creating the account, you consult the experts for help.
Now let’s know the steps in option two.
Option 2: Centurylink Email Settings According To Your Schedule
If you have created at the time of installing the service, you can create it later according to your schedule. But in this option will need your Welcome letter or bill, so make sure that you have any one of those handy before you start.
·        First, go to centurylink.net
·        Next click on the Email button in green color
·        You will find it at the top right side
·        Now click on the Create Account button in green color
After performing these steps you need to follow on-screen instructions and choose your login or email address and create a password. Next, similar to the above option, create a secret question and then write the answer. It will help you to change CenturyLink email settings when you forget or unable to access your account.
If you have performed all these steps successfully, you will see a pop-up message on the screen of the new account. Now you can enjoy all the new and advanced features of CenturyLink email. With your CenturyLink email account, you will be able to access its high-speed internet service. After creating the account you should know how to access the mail and check emails. Hence, for this read further.
Check Your Mails Using Webmail
As you have successfully setup the email and can use it anytime you want to. Therefore, below we have mentioned the steps to use it successfully on Webmail. Follow the below steps:
·        Directly open the home of your CenturyLink email
·        Now click on the Email button
·        And then enter the username and password
·        Now click on the login button to see all your emails
The CenturyLink service provides you access to 10 additional customizable email addresses that you can use or share with other members of your family.
Conclusion
While using the CenturyLink email at any time if you face any issue or error that stops you to access your mail then you contact the experts. If you get send/ receive issue in your CenturyLink mail you can take the expert help. Other than this issue, if you have any other issues such as opening attachments or if you start seeing a mailbox full error, the expert can help you in resolving. 
Originally published on emailsupport.us